Your first agent
In this tutorial you create a group, start an agent in it from the dashboard, give it work, and watch it. You also open its terminal, message it, and stop and wake it.
You need: Get started completed: the daemon running and
the dashboard open. You also need a project directory to work in: any git
repository you are happy to experiment in. The examples use
~/code/my-project.
1. Create a group
Agents live in groups. A group is a team with a shared working directory. In Groups, click + new group at the top right:
- Name:
hello; - Workspace: Use existing directory, and set Directory to
~/code/my-project. Agents you start in this group will work there.
Click Create group. The group appears, empty.
Go deeper
Dashboard → Creating a group workspace shows how to clone a repository for a group instead.
2. Start an agent
Open the group. Under its Subgroups line, click the blue spawn button (a person
with a plus sign). The similar button on the Subgroups line creates a subgroup
instead. The spawn dialog opens, joining hello, with the group's directory
as the agent's working directory. Set:
- Name:
alice; - Initial msg:
Read this project and tell me in three sentences what it does.
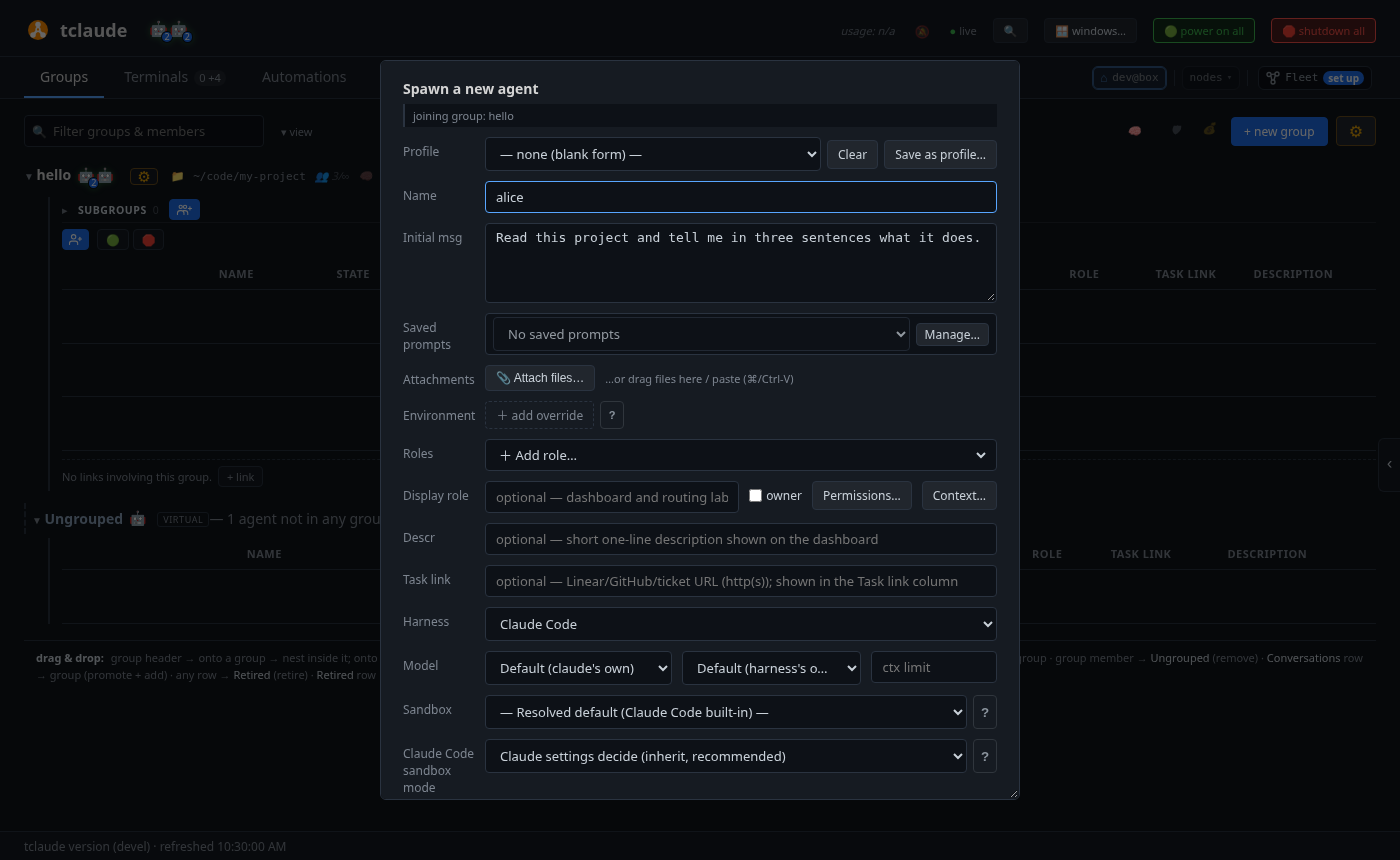
Because the directory is a git repository, the dialog also prepares a new
git worktree, a separate checkout on its own branch named after the agent.
Sync worktree branch with name does that, and it is on by default. For
this first agent, untick it and set Worktree to
(no worktree — use CWD above), so alice works in your project directory
itself. A later tutorial covers worktrees.
Leave the rest at its defaults: your default harness and model. To use another harness, pick it under Harness. Click Spawn.
Auto focus is on by default, so the agent's terminal opens in the Terminals tab. The first time a harness runs in a directory, it asks whether you trust it. Answer in that terminal. Until you do, the agent waits in the Pending spawns list in Groups; its focus button opens the same terminal.
Go deeper
Dashboard → The spawn dialog lists every field.
3. Watch it work
Go back to Groups. alice has a row in hello:
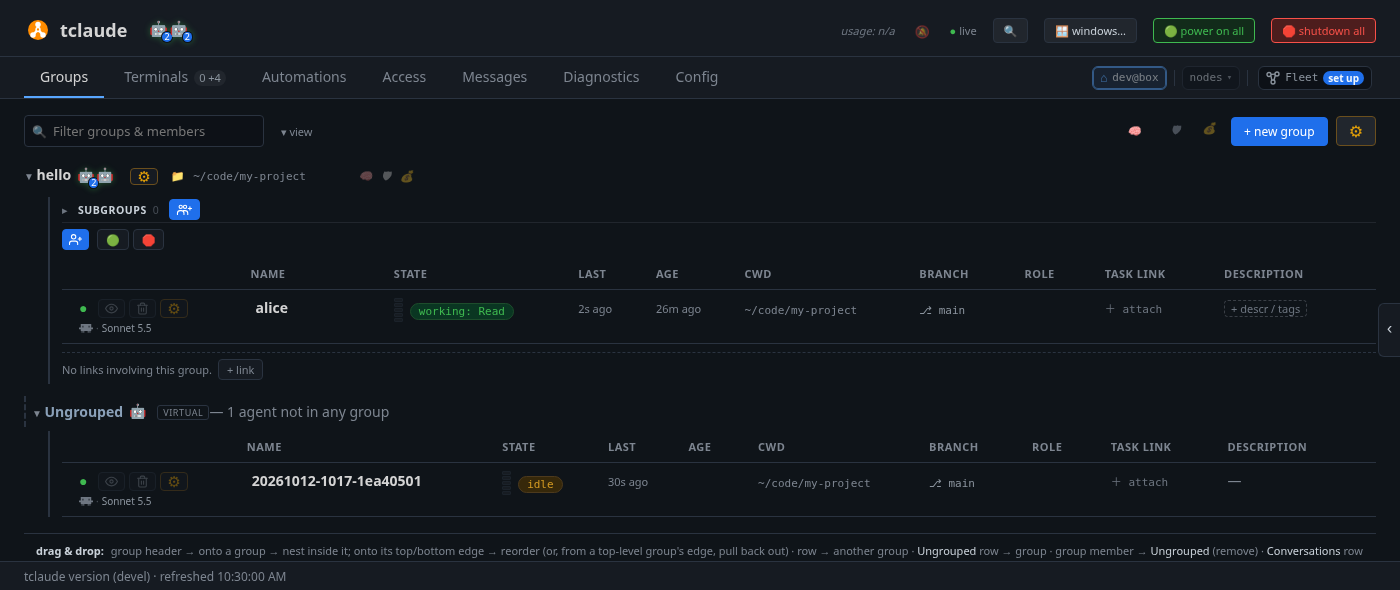
Read the row from left to right:
- the status dot:
●online,○offline; - the harness line: which harness and model the agent runs, and what it has cost so far;
- the Name;
- the State pill:
workingwhile the agent thinks,idlewhen it waits, andawaiting_permissionorawaiting_inputwhen it needs an answer from you. A small meter beside it shows how full the context window is; - CWD and Branch: where the agent works, with PR and CI status once it opens a pull request.
Go deeper
Dashboard → The member row explains every column, and the badge glossary every pill.
4. Open its terminal
Click the row's focus button (the eye). It takes you to alice's live
terminal in Terminals. This is the real session, not a copy: the agent's
answer is there, and what you type reaches the agent. Ask a follow-up
question.
Use focus whenever you want to see an agent or answer it. Ctrl-click (⌘-click on a Mac) opens the terminal without leaving Groups. Focus and ✉ Message, next, are the two things you will do most with any agent.
5. Send it a message
In the terminal pane, click ✉ Message (Ctrl M). This queues a message for the agent rather than typing into its terminal, so it never interrupts what the agent is typing. Send:
When you are done, list the three files you would read first.
The message lands in the agent's inbox and appears in its terminal.
6. Stop and wake it
Back in Groups, click alice's status dot ● and choose Soft exit.
The agent stops, and its conversation is kept. Click the dot again, now ○,
to wake it: it resumes the same conversation.
From the terminal
Everything above has a CLI equivalent, for scripts:
tclaude agent groups create hello --descr "my first team"
tclaude agent groups set-default-dir hello ~/code/my-project
tclaude agent spawn hello --name alice --cwd ~/code/my-project \
  --initial-message "Read this project and tell me in three sentences what it does."
Spawning and lifecycle covers the spawn options.
Native terminal windows
The agent's ⚙ menu also has terminals & windows…, which opens
native or browser terminals on the agent's live session or in its
directory. It is for people who run agents in native terminal
windows (dashboard.default_terminal set to "native") and sometimes
want a browser terminal. See
Terminals and Collab.
What you learned
- + new group creates a team with a working directory.
- The spawn button on a group starts an agent with a first task.
- A row shows the agent's status, model, cost and context.
- focus opens the agent's live terminal; ✉ Message writes to it. You will use these two all the time.
- The status dot stops and wakes an agent.
Next: Set up your team, or try the optional Ask the Steward first.